Monday, August 23, 2010

Kitchen Table Makeover

So you know when you just buy your first house right after getting married?  And you take in all of the hand-me-down furniture you can - because, frankly, houses are money-pits and it's hard to do all the improvements that you want and still save as much as you want.

Our kitchen table is one of those items.  It was the kitchen table that my father-in-law grew up on with his seven siblings, which is actually kind of cool to use the same table.  Let's just say that it has been used well.  And it must have been very stylish...in the 1960's.  And furniture from 50 years ago seems to be more sturdy than furniture today.  So, it is functional, and my husband is logical, and so we have a kitchen table.  Complete with golden wood finish and lime green vinyl cushions. 

Here's a little glimpse...


Oh, yes!  Despite the sweet puppy and crisp white table cloth, you just cannot hide that 1960's vibe! 

There is a saying in my family about furniture... if it's ugly...paint it white!  It has always worked for those garage sale pieces that I found to furnish my room during college.  And, I am proud to say that my furniture painting has expanded beyond just white.

So to give this sturdy, reliable, family heirloom a quick makeover, only a few steps and tools are necessary.  Find yourself some home dec weight fabric, a staple gun, paint brushes/rollers,  primer, and a high-gloss paint.  (high-gloss is said to be sturdier than a flat finish).

First you start with taking off the cushions by unscrewing the screws that hold them in place.  Then keep going with sanding down all the wood.  You don't have to sand too much, just enough to make scratches in the old varnish finish.  Then wipe the wood down and slap on a coat of primer.  If going with white, or a light color, a white primer will do.  If going with a darker color, you will want a tinted primer.  Once the primer dries, put on a few coats of paint.


Cut out your new fabric by laying a cusion down on the fabric.  Be sure to leave yourself with enough extra fabric to come up over the sides of the cushion, and then a few inches to work with on the underside of the cushions.  It is always better to have a little too much.  Cover the seat cushions with new fabric, pleat around the corners to give it more of a tailored look and around any curves to hold the fabric closer to the cushion.  Staple it down with a staple gun.  (...a strong husband may be a necessary tool when using the staple gun.  Those things just aren't made for comfort!)


Once all paint is dry, eagerly screw the custions back onto the chairs and...Viola! 


A whole new kitchen table!


Add a textured rug, and a few fake miniature apples in a wicker bowl, and it can change the whole feel of the room!


After all that hard work, don't you think it's time to sit back and enjoy a cold, fresh fruit smoothie on the last days of summer... yum.


Tuesday, April 27, 2010

Personalized ball pillows, wrinkly toes and sweet treats.

So today I got to meet a very special someone. 

She has delicate eyelashes, wrinkly toes, and pudgy knees.  Oh, and she was only 17 hours old and her name is Maggie.  Precious. 

My good friend, Sarah, had her baby girl last night.  You can see other posts (here, or here) related to baby showers and baby gifts for this much-anticipated little girl.

I came home totally energized about the miracle of perfectly formed babies... and had to channel this energy somehow into something productive.  My husband can only hear about the wrinkly toes so many times before he is convinced that I am crazy.

So, I started with some of these....I like to call them boy cookies.  They are chocolate walnut.


And, while I was at it... why not make some girl cookies (white chocolate cranberry)...


And, who can resist a few more ball pillows.  Personalized with an 'm' for Maggie.  (See the first round of these adorable pillows here)


Let's get a little close up of the 'm' detail.  Aren't details the little things that make life happy? 


Yep, details make me happy.

And, to keep me focused a little longer, let's put it all together in a picnic basket with a personalized tag.


There we go.  Energy channeled into goodies for mom and baby.  I can't wait to secretly drop these off on the doorstep to greet mom, baby and dad as they arrive home from the hospital tomorrow.  :)  Hooray!

Friday, April 23, 2010

T-Shirt Blankets


If you are anything like me, you have tons of t-shirts sitting around that you hold onto for the sentimental reasons... but you just don't wear them anymore.  And, you have friends who have the same pile of t-shirts.

A few years ago I made a t-shirt blanket out of my pile of shirts... maybe that will make a later post.  And, this year for Christmas, I played crafting 007 to make a blanket for my best friend. 

I emailed my best friend's mom (her mom lives in TN) and asked if she could sneak the pile of t-shirts out of my best friend's house (which happens to be in FL) and send them to me (in MI).  It was a multi-state plot necessary to make a great Christmas present.

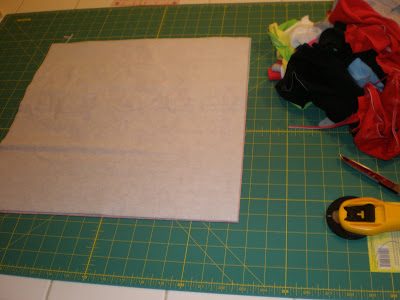
So, once the t-shirts arrived, it was time for the cutting, interfacing and sewing to begin!  I think I cut my interfacing in 16x16 in squares. (The blanket ended up being pretty much the size of twin-bed quilt.) Iron them onto the t-shirts, otherwise the t-shirt will stretch and pull every-which-way when sewing.


Once the interfacing is ironed on, cut the shirts to the size of the interfacing.


Once you get all the t-shirts prepped, you can begin to really personalize the blanket.  The pattern of shirts, the fabric used to outline the shirts (if any), and the thickness of your border can totally be up to you.

I followed the way I made my blanket - clean and simple with the fabric borders.  I like to add a little spice ot the back so that if you want, you can always flip it over and have a fun blanket.


There you have it!  A brand new blanket and perfect way to keep all those shirts lying around.

Fun, spunky, colorful, and cozy.  Perfect!

Tuesday, April 20, 2010

BALL PILLOWS!


I am so excited about this quick and easy project.  I love it.  It just makes me giggle, I think it's so sweet.

I have had a pattern and huge desire to make ball pillows for a long time now.  And, I just haven't found the time yet. 

So, last week when a friend dropped off flowers to me at work, I decided that she (or the baby girl in her belly) would be the first recipient of the ball pillow!  Sometimes it makes all the difference in the world to have flowers, a dog, and a pregnant belly to rub to brigthen your day.  And, since she is due THIS Friday, there is no time to waste with making these.

On Sunday when I sat down to this (with my flowers in the background, pattern tutorial on the computer, and sewing machine up and ready) - you know that makes for a great night!


I used this tutorial from the purl bee and made the size small ball.  It is so quick and easy, and makes a good size ball for a little one.  Here it is compared to my hand...


The steps were quick and straight forward:

Cut your peices (you'll need 8)


Sew your pieces together to form an inside out ball...


Turn it right-side out, stuff it, add the dots to the ends, and ENJOY!


These just tickle me so much.  I have decided that everyone needs a ball pillow.  How fun to have someone sit down on your couch and have a ball pillow.  I think I'll be trying the size large ball pillow soon.

Friday, March 12, 2010

Seriously Easy Pillow Covers


Okay, so let's play a game of what's wrong with the following picture...


If you guessed the green pillow with the red/khaki color scheme - You Guessed It!  Hooray!

(Okay, who am I kidding.  The green pillows has been around for almost 2 years.  I have really wanted to change them many times... but just now did it.  Oops)

So, I used fabric I had left over from our kitchen table makeover...which will likely make its way to a post soon.  And, I used this awesome tutorial.  The nice part is that the pillow cover has a zipper, so it is easy to wash.  The tutorial is really easy, and the part that took me the longest was cutting out the fabric.  For some reason, I am way too slow at cutting my peices.  But, then again, sewing is all in the prepartion and details.  I just don't know if the cutting preparation should take quite that long.  :)

And, after a little while of sewing goodness.... here is the final product!

LOVE it!

A close up of the zipper on the back:


And, when the flap is closed, you can barely tell there is a zipper!


I have gotten lucky a couple of times now where the pattern lines up quite nicely... it helps to hide the zipper even better.  Not really sure how I do that...

And a few other things... the tutorial calls for the zipper to be at the top of the pillow.  Oops.  The way I cut my fabric, the zipper ended up being on the side.  I like to call that a nice assymetrical look.

And, I accidentally bought a zipper too long.  So, you can easily fix that by using a wider zig-zag stitch and just stitch back and forth in one spot... it will end up looking like this:

You'll want to cut the zipper about an inch after your newly made stopper.

And, you remember in my last post when I talk about my crafting adventure exploding all over the kitchen? .... well....

Yep, there we have it.  It's a good thing that my sweet husband is out of town... and not here to be bothered by the sewing explosion.

Hope you have a happy day...

Wednesday, March 10, 2010

Simple Scrappy Birthday Card

So, I just stumbled upon a collection of pictures from my scrapbooking phase. 

I tend to craft in phases - depending on what stuff I decide to let explode all over the kitchen table.  I have always had dreams of a crafting room... where I can have my projects out and can close the door when the crafting chaos isn't a welcomed sight.  (...gasp!  I know - how could it ever not be welcome?!)

So, here is more scrapbooking goodness.  I love the idea of cards that are personalized just for the person to recieve them.  This one was made for my now brother-in-law's birthday a few years ago.

I guess the B could stand for Birthday - but in this case it was for his first name....


And, when you open the little tie, you get to see the birthday wishes....

And, then you can flip up the card and write your own message inside.

I love the tie, destressed edges, and the bronze staples.  A few guy-friendly details.  I like to think that scrapbooking goes to the next level when you pay attention to the details.  This card could really be personalized for any event... not just birthday wishes.

It's funny because this is about as masculine as I can get in my scrapbooking.  It's just so hard to try to persuade myself that ribbons, and grommets, and chalking and inking screams 'MAN!'.  It usually just is more female-friendly... although I think it's just good taste and cute, right?!

I'm hoping to get back to current-day crafting adventures... but work demands are making me look back at my past adventures... which isn't all bad, either! 

Monday, March 8, 2010

Paper Bag Books

Okay - so I love these.  They kind of combine all the goodness of scrapbooking, sewing (just barely), actual physical cards (which I think are all too rare anymore) and a whole bunch of thoughtfulness.

I have made a few, and I really don't know why I haven't made more.  Well... maybe I do.  I sometimes take hours doing a page in a scrapbook... so I would have to say it's safe to say that these would take me a long time.  And, I love doing them - so I'm not complaining one bit.  It's just that whole thing of there not being enough crafting hours in a day.  Bummer.

I made this one for my dad after he traveled to good 'ole Chi-town to support me in my 4th Breast Cancer 3-Day walk.  (Which, is all together a whole different series of posts because it is such an amazing and life changing event).  For those of you not familiar - the 3-Day is a walk that spans, you guessed it, 3 days.  We walk 20 miles per day - a total of 60 miles.  For these three days it is totally socially acceptable, and quite encouraged, to wear bras overtop tank-tops, on your hat, swirling around in the air, etc.  It's not everyday that I walk around in the wide-open public wearing a feather bra, a flowered coconut bra, or glittery seashell bra.  And, yes, I did make all three!  Hooray!  The crafting spans into 3-day accessories!

So, onto the paper bag book.  It is a cute way to make a card/book/scrapbooking momento/etc. 

All you do is take paper lunch bags.  I actually stumbled upon extra large bags - which was more fun because you can fit more onto a page. Stack the bags on top of one another.  I alternate the bags, so that the closed end of one is on top of the open end of another.  Stack as many as you want, and stitch down the center.  And - there you have it - a paperbag book!

Now, it is up to you just how you decorate it.  The open ends of the bags become little pockets to slip in extra little surprises.

They are so easy. So cute.  And such a fun surprise when someone is expecting a card to accompany a gift... or when they're expecting nothing at all.

Happy Crafting!

Friday, February 26, 2010

Baby Shower, and blankets and centerpeices, oh my!

Warning! Tons of pictures to follow.

I really had intentions of posting these in multiple posts. And, well, that didn't happen. The week has escaped me, and here we are!

The baby shower for a friend was last weekend at another friend's house... It turned out so fun and so cute. All the guests chipped in to make/create... and the outcome was so awesome. Here are a few pictures, because pictures really do make it all better - right?

Here is the set table...the 'placemats' are actually just 12"x12" scrapbooking cardstock. Clever! I'll show you another closer sneak peak of those centerpieces below. Hooray!


And a cute little onesie clothesline that doubled as part of a gift...


And, really what's a shower without a color scheme and some pregnant-momma-friendly smoothies? The colors were pink and yellow... Don't you just want one of those right about now? Despite the 12 degree night outside!


And, seriously, check out this cake. Isn't it just adorable!? An event planner, turned SAHM found the time to whip that together. Youza! (And, again, pretty yummy, too)

So, for the centerpieces, I found a cute tutorial from Miss Martha found here on making crepe paper flowers. I used dowels for the stems and floral tape. I think the tutorial shows/calls for wire. But, I wanted something more sturdy to stand up as a bouquet in a vase. They were really quite easy... And, my spider plant has been having tons of babies lately, so why not just throw in a couple of those, too. And, while we're at it... let's add a couple of pacifiers to look like flowers.


These ended up working out great! I was able to give one to momma-to-be, and one to each of the grandmas! A perfect first baby shower momento. Hooray!


A close up of the bouquet .... they were so easy... so fast...and a bright addition to the table.

And, now it's time for the baby blanket! And...well....the knitted baby blanket didn't actually get finished. (I can always finish it, and then add little flowers to cover the mistakes, and have it ready for the next shower.. right? I guess my 5-year knitting hiatus did impact my knitting skills. Who knew?!)

I really did try to finish it. I knitted, and knitted, and knitted, and knitted myself to sleep. But, I soon realized that there just aren't enough crafting hours in a day! So, the next best (or maybe better?) thing... a ribbon tag blanket - HOORAY!


It is about 2.5' x 2' or so. And, I'm told it is the perfect size for a car seat blanket. I also line it with 'warm & natural' quilting batting, so it's a bit warmer than the simple flannel... good for those freezing winter days. The ribbons are the little tags, and you can clip little toys or pacifiers on so they are never too far away from baby. And, once baby is no longer baby anymore, and a bit more like a toddler - it's a good size to be lugged around.

Here is a full picture of it - and you can kind of tell from the previous picture that it's reversible with cute skinny stripes in yellow and pink on the opposite side.


The momma-to-be loved it - and that is what makes handmade gifts totally worth it! I can't wait to meet baby girl, now!


Tuesday, February 9, 2010

Knitted Baby Blanket


So, I have a baby shower coming up. On February 20. Yes, I know, less than 2 weeks away. :)

And, as someone who loves to make things, I like to make things for gifts for baby showers (or any showers, or parties, or just because). I still try to buy something on the registry, because those are things the new mom has admittedly said that she needs. But, something handmade is just special. At least I think so.

So, my latest and greatest undertaking is a knitted baby blanket. I was actually inspired by this crocheted blanket here on Homemade By Jill. Now, mind you, I have crocheted before... but I cannot for the life of me start the chain. Hmmm. Does that pose a problem?

So, I decided that I would knit again, after taking a mere 5 year hiatus. And, I found a basketweave stitch KNITTED blanket. Simple, right?
Well... after I thoroughly screwed up the transition between knitting and purling, I pulled it out (yes, this just 3 days ago) and started fresh! Yikes!

I am now going with the ever-reliable garter stitch. (Yes, knitting every row). :)

Simple, reliable, and I still think pretty cute. Maybe I'll add a few knitted flowers... just for some spice.

Now, will I be able to finish by The 20th? Hmmmm. I see a bit of knitting in my future!!!
** Can anyone tell me how to have Blogger be more friendly when uploading pictures. As newby, I cannot figure it out. They always end up at the top and I cannot move them around. :) And, when adding pictures, it screws up the layout of the font. I think I'm missing something here... Growing pains...