Showing posts with label babies. Show all posts

Wednesday, August 15, 2012

Embroidered baby bibs

We recently hosted my husband's college roommates, their wives, and their babies for a weekend of fun in Northern Michigan.  Summer is the best time to be here, and we were so lucky that everyone could make it!  We had a total of 15 adults (including us) and 5 babies (including Lincoln, with him being the oldest at 11 months!).  Needless to say there was a lot of food, babies, and fun around this house.  In preparation, I thought it'd be sweet to make all of the babies matching bibs... you know... for all the work they put into coming up.  :)

I had seen onesies with little ties on them for boys in local boutiques and thought that was perfect for the little mini-men.  For the girls, I did a simple fabric stripe and bow.  I embroidered the names of the 5 babies who were present.  There are twin girls on the way for one couple, so they got a set of bibs, too.  But, the names are not being shared, so their bibs are nameless.  :)

I started by just free-handing a tie shape onto wax paper for my template and cut the fabric to match for the boys bibs.  Always leave a 1/2" seam allowance.  For the girls, I just cut out a strip of fabric.  To reinforce, I used some fusible interfacing that I had as scrap.  I then used a satin stitch and outlined the fabric.  To add the little details that make it more fun, I embroidered the name with my machine.


Lincoln's was the first bib I attempted since I was just kind of trying it out without any real direction.  I had set the stitch width to zero, which was not right.  I had to manually pull his through, and you can see it on the stitching.  He doesn't mind, though, and I learned better for the other bibs.

For the girls' bibs I also made a bow by cutting a strip of fabric and folding the edges under, and then in half.  I attached it with a few stitches and then tied the bow.  Next time it would be better to not stitch it down in the center, because when you tie the bow, one tail end is longer than the other.  But, the girls didn't mind this, either. 


Roll them up... tie with ribbon...


Arrange in a cute little bucket...


And attach a little tag for all our new friends.


:)


Thursday, July 5, 2012

Baby Elephant Quilt and Goodies

2 years.  Really?  How has 2 years gone by without a post?  Not to mention that I didn't do a good job at getting the posts going.  Oops.

I have done projects.  Lots and lots of projects.  So, I guess it is time to catch this blog up so that I can keep keeping track of what is going on. 

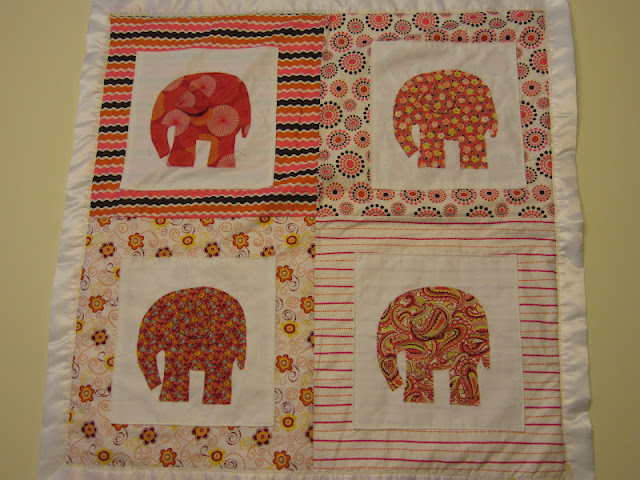
I recently made a baby quilt for a new baby girl in the family.  Momma likes bright colors and daddy loves elephants.  So, I found this quilt and pinned it, knowing that it would soon become a project.  Here is a pic of the inspiration...


There was a tutorial for the quilt above, but I like to just wing it.  It kind of feels more creative, or fun, or maybe just allows me to make mistakes and not feel so bad.  I'm sure that I recreate the wheel at times, but I guess that is how you learn best.

We originally thought that we would do 4 squares and each one would be made by me, one by grandma, one by another aunt, and the last by another aunt.  But, instead we did it all together, and bought all the fabric together.  We kind of did it assembly-line style with cutting, ironing, measuring, and I sewed it together.  Oh, and I just free hand sketched an elephant based on the picture above.  Maybe I should post that to this post for reference... huh?  I will make a note of that. :)

We ended up buying a LOT of fabric.  Not sure how we calculated...or miscalculated... the fabric to end up with so much extra, but it made for a few cute extras.

Here is the final products!

Here is our quilt.  I didn't even measure how big it was, but each square in total was maybe 16 " x 16".


On the back, we put a super-soft, super fun yellow fleece.  Different textures are so stimulating to growing babies.


A little detail we added, that I don't think was on the inspiration quilt, was elephant ears. How fun for a little one to discover the ears!  I think it makes the quilt, really.  Oh, and we left the edges of the elephants raw so that they would fray when washed over and over.  We thought it would add a fun detail, and we kind of had to when our first plan failed.... miserably.


Also, we included a satin border.  Again with the different texture thing.  My little man loves satin-y textures, so hopefully this little baby girl will like it, too!


A layer of Warm & Natural batting in the middle makes it super cozy.


And a close-up of each square.  Don't you just love this bird fabric?


Super bright and lots of contrast for baby's developing eyes.


The paisly-stripe square is my favorite, for sure.


More patterns, more bright colors, and more contrast!


With some of the leftover fabric, I made a little mini-blanket.  You know, to take along in the car, or have in the crib as a security blankie... and it is full of texture (soft yellow on back) and contrast again.


So fun.


And, because I just can't help myself, I had to make an elephant pillow.  But, it ended up looking more like an anteater with a nub for a tail.  :)  I still think she is pretty cute.


And, of course, soft yellow on the backside.


I love the skinny legs.


All layered up and ready to go!


Tuesday, April 27, 2010

Personalized ball pillows, wrinkly toes and sweet treats.

So today I got to meet a very special someone. 

She has delicate eyelashes, wrinkly toes, and pudgy knees.  Oh, and she was only 17 hours old and her name is Maggie.  Precious. 

My good friend, Sarah, had her baby girl last night.  You can see other posts (here, or here) related to baby showers and baby gifts for this much-anticipated little girl.

I came home totally energized about the miracle of perfectly formed babies... and had to channel this energy somehow into something productive.  My husband can only hear about the wrinkly toes so many times before he is convinced that I am crazy.

So, I started with some of these....I like to call them boy cookies.  They are chocolate walnut.


And, while I was at it... why not make some girl cookies (white chocolate cranberry)...


And, who can resist a few more ball pillows.  Personalized with an 'm' for Maggie.  (See the first round of these adorable pillows here)


Let's get a little close up of the 'm' detail.  Aren't details the little things that make life happy? 


Yep, details make me happy.

And, to keep me focused a little longer, let's put it all together in a picnic basket with a personalized tag.


There we go.  Energy channeled into goodies for mom and baby.  I can't wait to secretly drop these off on the doorstep to greet mom, baby and dad as they arrive home from the hospital tomorrow.  :)  Hooray!

Tuesday, April 20, 2010

BALL PILLOWS!


I am so excited about this quick and easy project.  I love it.  It just makes me giggle, I think it's so sweet.

I have had a pattern and huge desire to make ball pillows for a long time now.  And, I just haven't found the time yet. 

So, last week when a friend dropped off flowers to me at work, I decided that she (or the baby girl in her belly) would be the first recipient of the ball pillow!  Sometimes it makes all the difference in the world to have flowers, a dog, and a pregnant belly to rub to brigthen your day.  And, since she is due THIS Friday, there is no time to waste with making these.

On Sunday when I sat down to this (with my flowers in the background, pattern tutorial on the computer, and sewing machine up and ready) - you know that makes for a great night!


I used this tutorial from the purl bee and made the size small ball.  It is so quick and easy, and makes a good size ball for a little one.  Here it is compared to my hand...


The steps were quick and straight forward:

Cut your peices (you'll need 8)


Sew your pieces together to form an inside out ball...


Turn it right-side out, stuff it, add the dots to the ends, and ENJOY!


These just tickle me so much.  I have decided that everyone needs a ball pillow.  How fun to have someone sit down on your couch and have a ball pillow.  I think I'll be trying the size large ball pillow soon.